Todd's Blog

Todd's Tips for System Adminstrators

  • TechDays
  • Speaking Engagements
  • Contact Me
  • About Me

Connect

  • LinkedIn

Powered by Genesis

Installing and Updating Adobe Reader

posted on January 20, 2015

I am working with a customer and assisting them with their application updates. One of the applications needing updating is Adobe Acrobat Reader MUI. This version of Adobe Reader allows it to be displayed in English or French depending on what language the user is using. Reader is also one of those pain in the ass applications that nag the user to update all the time, so getting in front of this one and updating proactively is always a good way to get ahead of the bullshit calls you’ll get to the service desk. The users shouldn’t have to be asked if they want to update. We should be managing that for them and we know if we can update based on testing those patches.

If you already have Adobe Reader installed, just follow the part in regards to the MSP file. But if you don’t have Adobe Reader installed yet, basically it’s a quick install and update. Here is the link to the Adobe ftp site if you need to download the files. ftp://ftp.adobe.com/pub/adobe/reader/win/11.x/ When you download the Enterprise build, Adobe includes an admin customization tool, but I just ignore that crap. Seriously, unless there is a good reason to run that junk I don’t use it. In my opinion and in my case, there isn’t a good reason to use it as I don’t deviate from the standard install.


Adobe-Reader-Directory
Adobe Reader Directory with install files.

Run msiexec.exe /I AcroRead.msi /q. This will install the base of Adobe reader. In my case it’s version 11.0.00. Next grab the current msp file. If you already had Adobe Reader installed, this is your starting step. These are similar to an MSI file but updates. The command to execute these is msiexec.exe /update AdbeRdrUpd11010_MUI.msp /q. This will install the update bringing the MUI up to in my case 11.0.10.

For those of you using System Center Configuration Manager as I am, there are a couple of ways to ensure the order is maintained. Out of Order will cause a failure or at least the base version of Adobe Reader without the update. Create two packages, one package with source files for the Adobe Reader install (msiexec.exe /I AcroRead.msi /q) and the second package will be the Adobe Reader MSP (msiexec.exe /update AdbeRdrUpd11010_MUI.msp /q). Once you have the packages, you have two ways you can do this.

One way to do this is to roll a task sequence with the Adobe Reader msi install first followed by the Adobe MSP patch in the next step. Advertise that task sequence to your collection and Bob’s your uncle.

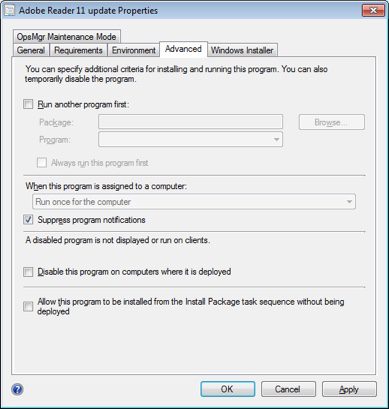
The other way is to edit the program properties of the patch and tell it to run another package first. In this case, Adobe Reader will be the package you will select to run first. Save that and then the patch will be the package you advertise to your collections.

Configuration-Manager-Program-SCCM
Program Properties in Configuration Manager 2012 SP1

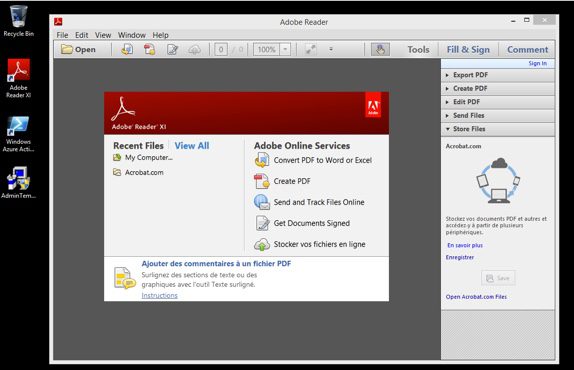
Here is after the deployment. My machine in English language –

Adobe-Reader-English
Adobe Reader welcome screen on an english computer.

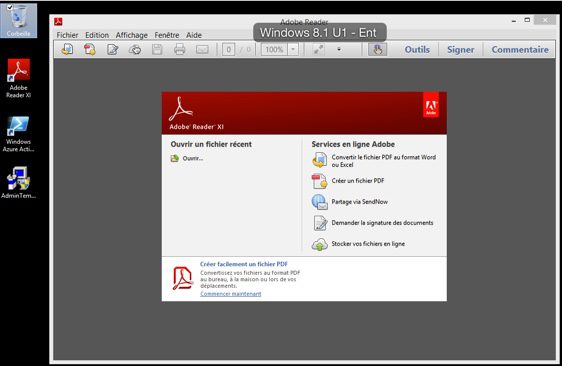
And then changing my language to french, notice the recycle bin name. –

Adobe-Reader-French-MUI
Adobe Reader welcome screen on a french computer.


Filed Under: Deployment Tagged With: Adobe, Adobe Reader, CM12, MDT, SCCM, System Center Configuration Manager, Task Sequence

Editing CustomSettings.ini in MDT

posted on January 26, 2010

One of the neat things you can do with Microsoft Deployment Toolkit 2010 is you can customize it to show or hide screens when running through the deployment wizard.

Lets have a look at my customsettings.ini file, the file is found in the Control folder. This file is on my memory stick and installs my Patron computer builds. What I do is block all pages except the computer name field. I manually enter the computer name and I am off to the races. It also will give me the final summary letting me know if everything worked or not.

[Settings]
Priority=Default
Properties=MyCustomProperty
 
[Default]
OSInstall=YES
SkipAdminPassword=YES
SkipApplications=YES
SkipAppsOnUpgrade=YES
SkipBDDWelcome=YES
SkipBitLocker=YES
SkipCapture=YES
SkipComputerName=No
SkipComputerBackup=YES
SkipDeploymentType=YES
DeploymentType=NEWCOMPUTER
SkipDomainMembership=YES
JoinDomain=yourdomain.local
DomainAdmin=Deployment_Account
DomainAdminDomain=yourdomain
DomainAdminPassword=Pa$$w0rd
SkipFinalSummary=No
SkipLocaleSelection=YES
KeyboardLocale=en-US
UserLocale=en-US
UILanguage=en-US
SkipPackageDisplay=YES
SkipProductKey=YES
SkipSummary=YES
SkipTaskSequence=YES
TaskSequenceID=VISTAPATRON
SkipTimeZone=Yes
TimeZone=035
TimeZoneName=Eastern Standard Time
SkipUserData=Yes

In order for this to work properly, we need ensure we modified our task sequences to install software we want installed. We also need to ensure when setting up the task sequence we entered in a license key (if needed) and the admin password.

I’ll be covering these customizations of a few blog posts. I am also going to be creating some instructional podcasts around MDT as well, so this could be included in that.

For more information on this as well, check out fellow MVP Mitch Tulloch’s posts on the subject at http://www.windowsnetworking.com/articles_tutorials/Deploying-Windows-7-Part7.html. He has a whole series dedicated to Windows 7 Deployment.

Filed Under: Deployment Tagged With: Customizations, customsettings.ini, Deployment Wizard, MDT, Task Sequence

Pause Task Sequence in MDT 2010

posted on January 6, 2010

With a new year comes new images for my MDT servers. At TechDays in Ottawa, I presented the MDT session in the client track on Day 1. Afterwards, I had some great discussions with a few people from major Canadian government offices. One of my challenges has been how to add extra software to an image which doesn’t have a great silent install. What I had been doing was building the machine using MDT, then when it was done, adding unfriendly software, patches, etc. to the build after. This is a pain as you have to then Sysprep the image, boot into a Windows PE environment then capture the image using ImageX.

The people I met spend the majority of their day building images. For me, I do this a couple of times of year. They had some great experiences which they shared and one of those things was a pause task sequence routine they are using. What it is a call to pause the machine sequence build. Some of them are using a VBscript which essential calls notepad and leaves it open while you do all the extra work you need to do. When you close notepad, MDT continues on with its task sequence. Also new to MDT 2010 is a script called LTISuspend.wsf.

The method I chose was to create a batch file called pausetask.bat with one line:

START /WAIT Notepad.exe .\SomeTextFile.txt

Then, I saved it in a folder and created a new application called Pause Task Sequence – Notepad. Here is a snapshot of the properties of the application.

Microsoft Deployment Toolkit (MDT) 2010 Application Properties Snapshot

Next thing you want to do is ensure that the pause task runs on your fresh builds. On my Windows 7 install task (and I should note, this works with all versions of Windows you can deploy with MDT, even Windows XP), I added an install application task to my task sequence. To do this, click Add and general and Install Application. I add the new task sequence right after I install my applications.

Microsoft Deployment Toolkt (MDT) 2010 Add New Task Sequence Install Application Snapshot

As long as I keep notepad open, the task sequence pauses to let me do other things. I was able to install some custom line of business applications to my builds yesterday and install Windows Updates prior to capturing the image. You can even reboot the computer and as long as you don’t manually close notepad, the computer reboots and notepad pops back up, continuing to pause the MDT task sequence.

If you want to use the new method of calling LTISuspend.wsf in MDT 2010 then add a command line task instead of an install application task.

Microsoft Deployment Toolkt (MDT) 2010 Add New Task Sequence Run Command Line Snapshot

In the command line enter

cscript.exe %SCRIPTROOT%\LTISuspend.wsf

Microsoft Deployment Toolkt (MDT) 2010 Properties of Run Command Line Task Snapshot

Then when this one executes, the LTI process suspends, you do what ever you need to do and then when you are ready to continue on, you click a desktop shortcut to resume the process.

While there is a capture image task sequence now part of MDT 2010 as well, capturing the image while building the computer is the preferred option.

A couple of articles to check out on this subject:

http://blogs.technet.com/deploymentguys/archive/2008/07/07/useful-script-number-6-pausing-the-task-sequence.aspx

http://www.eggheadcafe.com/software/aspnet/33524765/how-to-pause-the-capture.aspx

http://blogs.technet.com/mniehaus/archive/2009/06/27/mdt-2010-new-feature-3-suspend-and-resume-a-lite-touch-task-sequence.aspx

Filed Under: Deployment Tagged With: Building Images, Image Boot, MDT, MDT 2010, Microsoft Deployment Toolkit, Task Sequence

Recent Posts

  • Office 365 – Creating Custom SKUs
  • Setting a Default Printer in Windows 10
  • Deploying Windows to the Correct Drive in Configuration Manager
  • Surface Pro 4, Surface Dock and DVI Problems
  • Enabling UEV in Windows 10 1607

Recent Comments

  • Moore Details on Setting up a Delayed Charge in Quickbooks Online
  • MCP Exam Training on Using PowerShell to Get a List of Groups from Active Directory
  • Kac on Setting up an Office 2010 KMS Host Server
  • prabumedia.com | Pilih lisensi MAK atau MKS untuk aktifasi produk Microsoft ? on Setting up a KMS Server
  • prabumedia.com | Pilih lisensi MAK atau MKS untuk aktifasi produk Microsoft ? on Setting up an Office 2010 KMS Host Server

Archives

Categories

Meta

  • Log in
  • Entries feed
  • Comments feed
  • WordPress.org