Todd's Blog

Todd's Tips for System Adminstrators

  • TechDays
  • Speaking Engagements
  • Contact Me
  • About Me

Connect

  • LinkedIn

Powered by Genesis

Q&A from my Session on MDT Today

posted on November 27, 2008

I had an interesting question from Rick who works at CSC today with regards to MDT and being able to specify which model of computer gets which driver. If you put a driver in the Out of Box Drivers, the concern is you can’t specify which driver will be installed for a given machine, it will select what it feels is the best for the hardware. Now hardware companies like Dell and Lenovo make drivers for an ATI card along with ATI. If you add all three, which gets picked, how can he ensure the lenovo gets the lenovo driver and not the ATI driver for the card?

The solution

After lunch, I came back to my laptop and did some searching. I came across the solution via the The Deployment Guys Blog.

In a nutshell, here’s what one has to do.

First, create a new driver group called No Drivers, don’t add any drivers to that group.

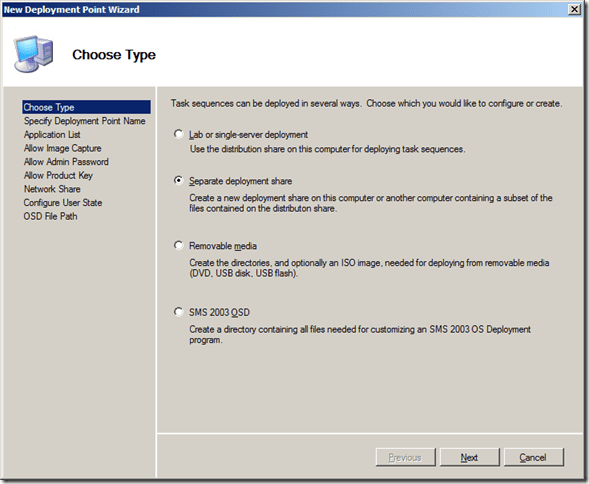
Create a separate deployment point (the second option in the deployment points)

image

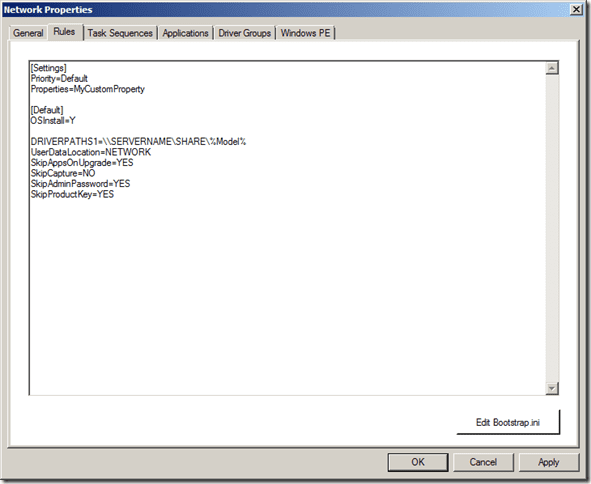
Right click on the new distribution point  and click properties. In properties, hit the rule tabs and add below [Default]

DRIVERPATHS1=\\SERVERNAME\SHARE\%Model%

image

You will need to make the folder you specified above, share it and create directories in the share folder which correspond to the value the WMI gathers during the MDT deployment process. Put in the drivers you want into the model directories.  For example, the model name on my VM is Virtual Machine, I would need a folder called \\Servername\Share\Virtual Machine

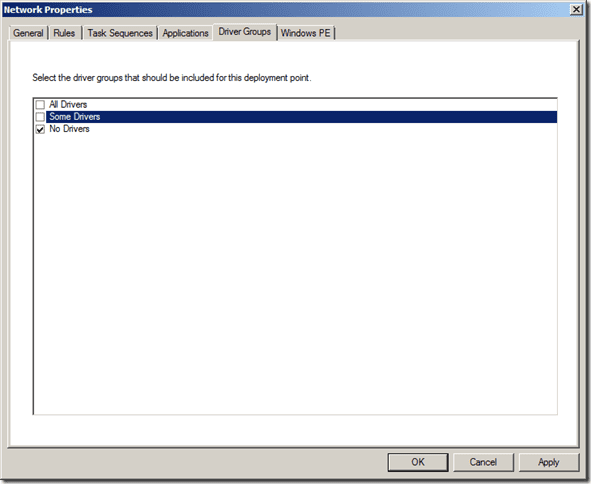
Next in the properties, jump over to drivers tab, select the no drivers option.

image

Click okay. Rebuild you file index and you have the solution to the problem.

Technorati Tags: TechDays_CA

Filed Under: Deployment Tagged With: MDT 2008, Techdays

Links from my Microsoft Deployment Toolkit Presentation Today at TechDays in Ottawa

posted on November 27, 2008

As promised in my presentation, here are the links to go with my presentation today at TechDays

Config Manager Pre-execution Hook

http://technet.microsoft.com/en-us/library/bb694075.aspx

The Deployment Guys Blog

http://blogs.technet.com/deploymentguys/

Michael Niehaus’ Windows and Office deployment ramblings

http://blogs.technet.com/mniehaus/

Microsoft Deployment Toolkit Team Blog

http://blogs.technet.com/msdeployment/

The USMT Team Blog

http://blogs.technet.com/usmt/default.aspx

Filed Under: Deployment Tagged With: Deployment, Links, MDT 2008, Microsoft Deployment Toolkt

Microsoft Deployment Toolkit – My Experience

posted on March 22, 2008

I downloaded and installed the Microsoft Deployment Toolkit (formerly known as BDD 2007) a couple of weeks back on my deployment servers to help me roll out new computers for our new library in Yarker. A had a heck of a time making it work right. I added the boot image to my WDS server and that went okay and I also added the WDS Capture boot image so I can capture images from my base machines.

So far so good.

I built my computer the way I wanted it for a base image, syspreped it and then booted using my WDS capture boot image. This is good so far. The image was captured then I copied it to my deployment server and added it as a operating system. I also added a few applications and gave it the proper silent install command line. Again so far so good. Then I decided to try rolling out the image.

This was not so good.

First off I was missing the install files. The easy fix for this is to add Vista as an operating system from the DVD, so I did that and that error was solved. Then I ended up not having any images show up when I tried using my custom WIM file in my script. Weird, so I tried a fresh Vista install, that worked but all the options I set in MDT weren’t being picked up. Turns out, using a Dell Vista DVD has an $OEM$ folder in the sources directory. You need to remove the items in this folder from your deployment point as MDT will inject its own files. So the settings problem is fixed on fresh installs using the tool but why no images when I try to use a custom image? Turns out using the WDS capture tool fails to add an edition to the WIM file. Using ImageX you can add an addition flag to the file, or use the Capture tool within MDT.Just a note, the capture tool within BDD builds your operating system from what ever operating system you select, installs any drivers, applications you select then captures the machine. Don’t use it to capture an already formed baseline. I used ImageX to add an edition flag then re-added to MDT. Then I was able to apply my custom image to a new computer and the proper applications were installing and I was good to go. Took me a couple of days of poking around with MDT to make it go properly, but it went pretty slick once I did.

A really good website for information for me was http://www.windows-noob.com. They had a lot of useful articles for MDT which helped me out with the Dell DVD source directory issue, which was what I needed to get things going properly.

My next project with it is to play with Windows XP on MDT and get things installed using it.

Filed Under: Deployment Tagged With: BDD, MDT 2008

Recent Posts

  • Office 365 – Creating Custom SKUs
  • Setting a Default Printer in Windows 10
  • Deploying Windows to the Correct Drive in Configuration Manager
  • Surface Pro 4, Surface Dock and DVI Problems
  • Enabling UEV in Windows 10 1607

Recent Comments

  • Moore Details on Setting up a Delayed Charge in Quickbooks Online
  • MCP Exam Training on Using PowerShell to Get a List of Groups from Active Directory
  • Kac on Setting up an Office 2010 KMS Host Server
  • prabumedia.com | Pilih lisensi MAK atau MKS untuk aktifasi produk Microsoft ? on Setting up a KMS Server
  • prabumedia.com | Pilih lisensi MAK atau MKS untuk aktifasi produk Microsoft ? on Setting up an Office 2010 KMS Host Server

Archives

Categories

Meta

  • Log in
  • Entries feed
  • Comments feed
  • WordPress.org